Trailer wiring can be a tricky task, especially if you’re not familiar with the different types of wiring diagrams. One common type is the 4-pin wiring diagram, which is used for smaller trailers. Understanding how to properly wire your trailer can ensure safe towing and proper functioning of lights and signals.
Having a 4-pin wiring diagram can make the task of wiring your trailer much easier. It provides a clear outline of how each wire should be connected, making it simpler for even beginners to follow. By following the diagram, you can ensure that your trailer lights and signals work properly, keeping you and other drivers safe on the road.
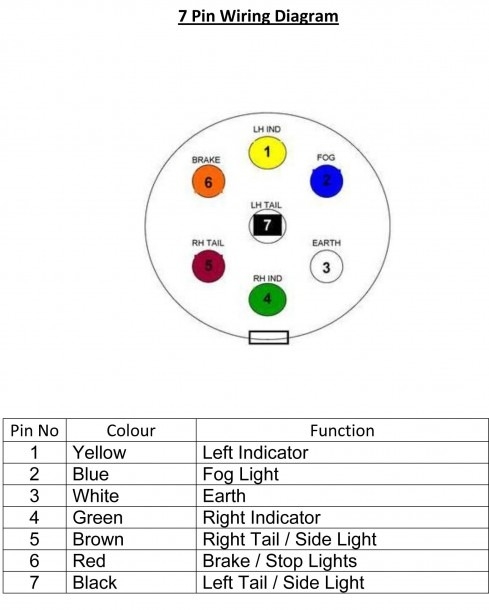
 Connect Your Car Lights To Your Trailer Lights The Easy Way Trailer (www.pinterest.com)
Typically, a 4-pin wiring diagram includes wires for the left turn signal, right turn signal, brake light, and ground. Each wire is color-coded for easy identification, with standard colors such as brown for the tail lights, yellow for the left turn signal, green for the right turn signal, and white for the ground wire. By connecting each wire according to the diagram, you can ensure that all necessary signals are transmitted from your vehicle to the trailer.
When wiring your trailer, it’s important to double-check all connections and ensure that they are secure. Loose or faulty connections can result in non-functioning lights or signals, which can be dangerous when driving. Using a wiring diagram can help you troubleshoot any issues and ensure that your trailer is properly wired for safe towing.
Overall, having a 4-pin wiring diagram for your trailer can make the task of wiring much simpler and more efficient. By following the diagram and double-checking all connections, you can ensure that your trailer lights and signals work properly, keeping you safe on the road. Whether you’re a beginner or an experienced trailer owner, having a clear wiring diagram can make the process smoother and more successful.