When it comes to installing a new radio in your car, proper wiring is crucial for ensuring that everything functions correctly. Pioneer radios are known for their high quality and advanced features, but without the correct wiring, you may not be able to enjoy all of the benefits that they have to offer.
Whether you are upgrading to a Pioneer radio for better sound quality or more advanced connectivity options, following a wiring diagram is essential for a successful installation. Without the proper wiring, you run the risk of damaging your new radio or even causing electrical issues in your vehicle.
 Pioneer Car Stereo Wiring Diagram Beautiful Luxury Deh 1300Mp Colors (2020cadillac.com)
Pioneer Radio Wiring Diagram
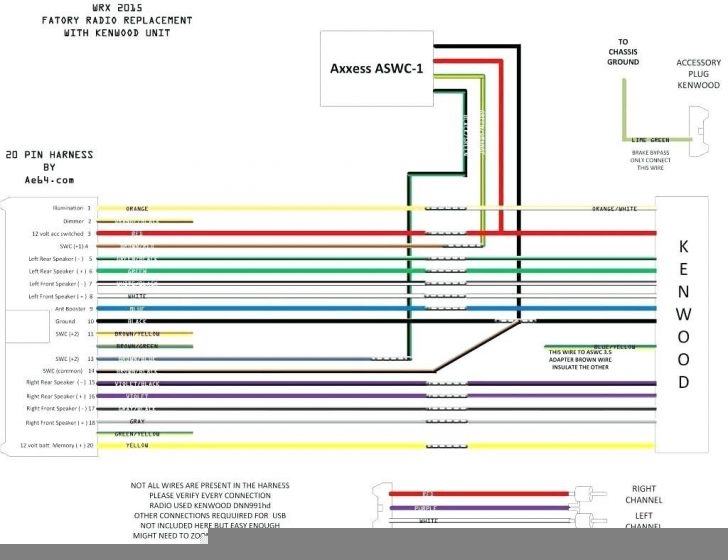
One of the most important steps in installing a Pioneer radio is to refer to the wiring diagram that comes with the radio. This diagram will show you exactly how to connect the various wires to your car’s existing wiring harness. It will also indicate which wires are for power, ground, speakers, and other components.
When following the wiring diagram, be sure to use the correct tools and techniques to make secure connections. Improperly connected wires can lead to malfunctions or even pose a safety hazard. Take your time and double-check your work to ensure that everything is connected properly.
If you are unsure about any aspect of the wiring process, it is always best to consult a professional installer. They will have the experience and knowledge needed to ensure that your Pioneer radio is installed correctly and safely.
By following the wiring diagram provided by Pioneer, you can enjoy all of the features and benefits of your new radio without any issues. Proper wiring will help to ensure that your radio operates smoothly and reliably for years to come.
So, before you start installing your new Pioneer radio, be sure to carefully review the wiring diagram and follow it step by step. Taking the time to do it right the first time will save you from headaches and potential problems down the road.