When it comes to setting up a 3 way switch wiring diagram with power at the light, it’s important to understand the basics of how this type of circuit works. A 3 way switch allows you to control a light fixture from two different locations, such as at the top and bottom of a staircase or at either end of a hallway. By following the correct wiring diagram, you can easily install a 3 way switch setup with power at the light.
One common misconception about 3 way switch wiring is that the power must come into one of the switches. However, when the power comes into the light fixture first, the wiring can be a bit more complex. In this scenario, the power source connects to the light fixture, and then the two switches are wired in series to control the flow of electricity to the light.
 Two Switch Wiring Diagram (resolutionsforyou.com)
Here is a basic 3 way switch wiring diagram with power at the light:
1. Connect the power source to the light fixture using a black wire.
2. Run a 3-wire cable from the light fixture to the first switch location.
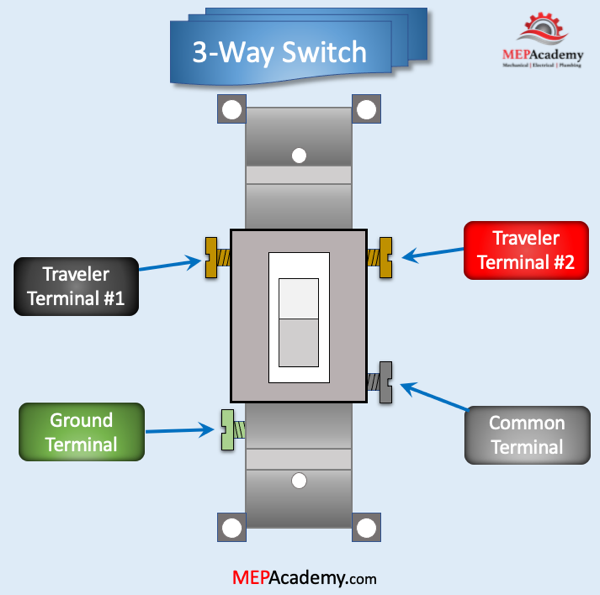
3. Connect the black wire from the light fixture to the common terminal on the first switch.
4. Connect the white wire from the light fixture to the neutral terminal on the first switch.
5. Connect the red and black traveler wires to the remaining terminals on the first switch.
6. Run another 3-wire cable from the first switch location to the second switch location.
7. Connect the red and black traveler wires from the first switch to the corresponding terminals on the second switch.
8. Connect the white wire from the first switch to the neutral terminal on the second switch.
By following this wiring diagram, you can successfully set up a 3 way switch with power at the light. It’s important to turn off the power at the breaker before starting any electrical work and to double-check all connections before turning the power back on.
In conclusion, understanding how to wire a 3 way switch with power at the light can be a useful skill for any DIY homeowner. By following the correct wiring diagram and taking proper safety precautions, you can easily install a 3 way switch setup in your home.