When it comes to home improvement projects, knowing how to wire a light switch is an essential skill. Whether you’re replacing an old switch or installing a new one, having a clear diagram to follow can make the process much easier.
Before you begin, it’s important to turn off the power to the circuit you’ll be working on. This can usually be done by flipping the corresponding breaker in your electrical panel. Once the power is off, you can safely proceed with the wiring process.
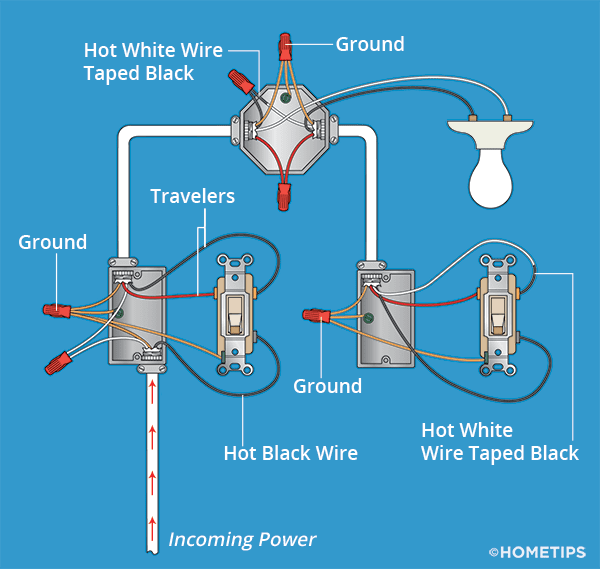
 3 Way Gang Switch Wiring Diagram Wiring Switch Gang Box Fantastic 3 (www.wiringdiagramid.com)
Start by removing the cover plate of the existing switch to expose the wiring. Take note of how the wires are currently connected to the switch so you can replicate the setup with the new switch. It’s a good idea to take a picture or make a diagram of the current wiring for reference.
Next, disconnect the wires from the old switch and connect them to the new switch according to the diagram. Typically, you’ll have a black wire (hot), a white wire (neutral), and a green or bare copper wire (ground). Follow the manufacturer’s instructions for your specific switch to ensure proper connection.
After the wires are securely connected, carefully tuck them back into the electrical box and attach the new switch. Secure the switch with the screws provided and replace the cover plate. Finally, turn the power back on and test the switch to make sure it’s working properly.
It’s important to note that if you’re unsure about any part of the wiring process, it’s best to consult a professional electrician. Working with electricity can be dangerous, so it’s always better to err on the side of caution.
By following a clear wiring diagram and taking the necessary safety precautions, you can successfully wire a light switch in your home. With a little bit of know-how and the right tools, you can tackle this project with confidence.