When it comes to home electrical wiring, understanding how to wire a 3 way switch is essential. This type of switch allows you to control a light fixture from two different locations, making it a convenient option for rooms with multiple entry points. By following a simple wiring diagram, you can easily install a 3 way switch in your home.
Before attempting to wire a 3 way switch, it’s important to gather the necessary tools and materials, including a screwdriver, wire strippers, electrical tape, and a voltage tester. Additionally, be sure to turn off the power to the circuit at the breaker box to avoid any accidents while working with electrical wiring.
 3 Way Switch Wiring Diagram Guide (schempro.com)
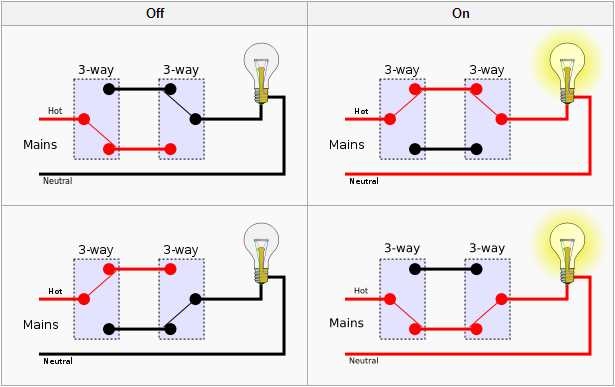
Wiring 3 Way Switches Diagram
To wire a 3 way switch, you will need three-wire cable with a ground wire, two three-way switches, and two two-way switches. Begin by running the three-wire cable between the two switch locations, making sure to leave enough slack at each end for easy connection. At each switch location, connect the white wire to the common terminal, the black wire to one of the traveler terminals, and the red wire to the other traveler terminal.
Next, connect the black wire from the power source to the common terminal of the first switch, and connect the black wire leading to the light fixture to the common terminal of the second switch. Finally, connect the ground wires from all the cables together and secure them to the switches’ grounding terminals. Once all the connections are secure, turn the power back on and test the switches to ensure they are working properly.
It’s important to note that if you are unsure about any part of the wiring process, it’s best to consult a professional electrician to avoid any potential hazards. By following a wiring diagram and taking the necessary safety precautions, you can successfully wire a 3 way switch in your home.
In conclusion, understanding how to wire a 3 way switch is a valuable skill for any homeowner. By following a simple wiring diagram and using the proper tools and materials, you can easily install a 3 way switch in your home. Remember to always prioritize safety when working with electrical wiring and consult a professional if needed.