When it comes to installing or replacing a single pole light switch in your home, it’s important to have a clear understanding of the wiring diagram. A single pole light switch is the most common type of switch found in homes, and knowing how to properly wire it can save you time and frustration.
Before you begin the installation process, make sure to turn off the power to the circuit at the breaker box. This is crucial for your safety while working with electrical wiring. Once the power is off, you can proceed with the wiring of the single pole light switch.
 How To Wire Single Pole Light Switch With Pilot Light Terry Love (terrylove.com)
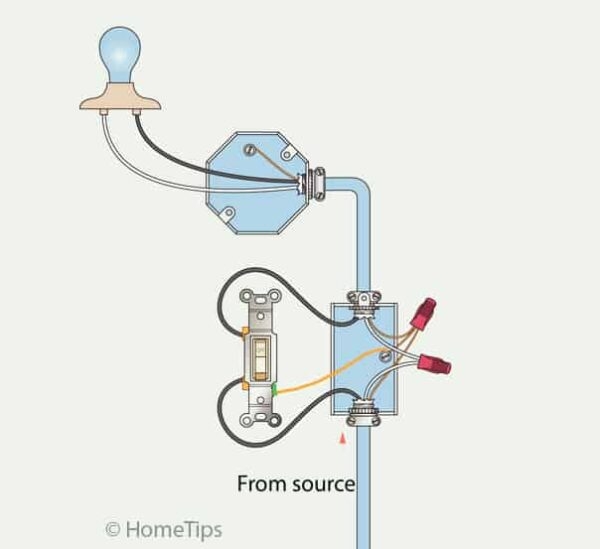
Start by identifying the hot wire in the electrical box, which is typically black or red in color. This wire will be connected to the “line” terminal on the switch. The neutral wire, which is usually white, should be connected to the silver or light-colored terminal. Finally, the load wire, which is the wire leading to the light fixture, should be connected to the brass or dark-colored terminal on the switch.
If you are unsure about which wire is which, it’s always best to consult a professional electrician to avoid any potential hazards. Once all the wires are securely connected to the appropriate terminals, you can safely turn the power back on and test the switch to ensure it is functioning properly.
It’s important to note that single pole light switches do not have a ground terminal, as they are not required for this type of switch. However, if you are installing a switch in a metal box, be sure to ground the switch by connecting the ground wire to the metal box itself.
In conclusion, understanding the wiring diagram for a single pole light switch is essential for a successful installation. By following the proper steps and safety precautions, you can easily replace or install a single pole light switch in your home. If you have any doubts or concerns, don’t hesitate to seek professional help to ensure the job is done correctly.