When it comes to electrical wiring in your home, it’s important to have a basic understanding of how things work. One common wiring setup that many homeowners encounter is the 3 way switch. This type of switch is commonly used in stairways, hallways, and large rooms where multiple switches control the same light fixture. Understanding the wiring diagram for a 3 way switch can help you troubleshoot any issues and make necessary repairs.
By having a clear understanding of how a simple 3 way switch wiring diagram works, you can easily identify which wires are connected to which terminals on the switch. This knowledge can be invaluable when trying to diagnose a problem with your lighting system. It can also help you make upgrades or changes to your existing wiring setup without having to call in a professional electrician.
 3 Way Switch Wiring Explained Infoupdate (infoupdate.org)
Simple 3 Way Switch Wiring Diagram
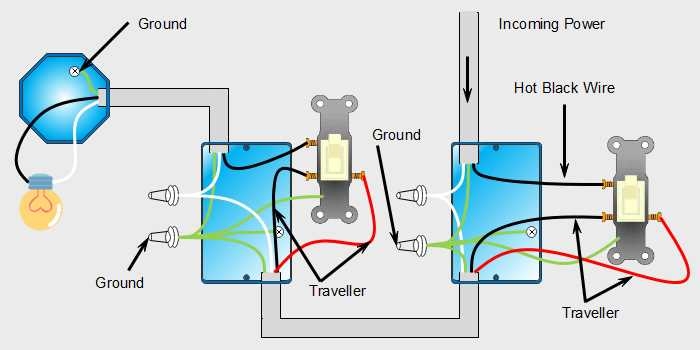
When wiring a 3 way switch, you will typically have two switches that control the same light fixture. One switch will be located at the top of the stairs or hallway, while the other switch will be at the bottom. The wiring diagram for a 3 way switch consists of three terminals: a common terminal and two traveler terminals. The common terminal is typically a different color than the traveler terminals to differentiate between them.
To wire a 3 way switch, you will connect the common terminal to the hot wire coming from the power source. The traveler terminals will then be connected to the other switch and the light fixture. By flipping either switch, you can turn the light on or off from either location.
It’s important to follow the wiring diagram carefully and ensure that all connections are secure. If you’re unsure about any part of the process, it’s always best to consult a professional electrician to avoid any safety hazards.
Understanding the simple 3 way switch wiring diagram can save you time and money when it comes to troubleshooting and making repairs to your lighting system. With the right knowledge and tools, you can easily navigate the wiring setup and make any necessary adjustments with confidence.
Remember to always prioritize safety when working with electrical wiring and never attempt any repairs or installations if you’re unsure of what you’re doing. By following the proper procedures and guidelines, you can ensure a safe and functional lighting system in your home.