Installing a Lutron dimmer switch can add convenience and ambiance to any room in your home. With the ability to adjust the brightness of your lights, you can create the perfect atmosphere for any occasion. However, before you can enjoy the benefits of a dimmer switch, you need to make sure it is properly installed. The wiring diagram for a Lutron dimmer switch will guide you through the installation process to ensure everything is connected correctly.
Before starting the installation process, it is important to turn off the power to the circuit you will be working on. This will help prevent any accidents or injuries while working on the wiring. Once the power is off, you can begin following the wiring diagram provided by Lutron for your specific dimmer switch model.
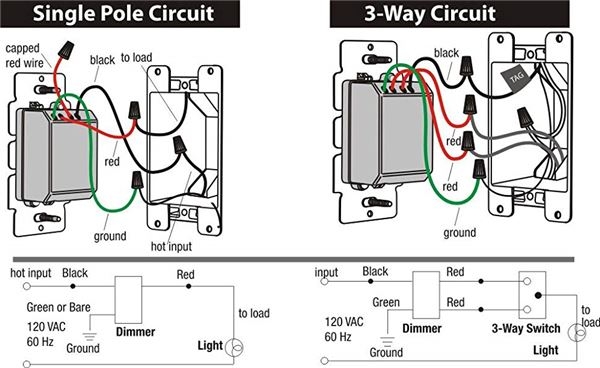
 Step By Step Guide Wiring A Lutron 3 Way Dimmer Switch With Diagram (techschems.com)
Typically, a Lutron dimmer switch will have three wires: a hot wire, a load wire, and a ground wire. The hot wire is typically black, the load wire is usually red or blue, and the ground wire is green or bare copper. Follow the instructions on the wiring diagram to connect each wire to the corresponding terminal on the dimmer switch.
After all the wires are securely connected, you can turn the power back on and test the dimmer switch. If everything is working properly, you can now enjoy the benefits of adjustable lighting in your home. Remember to always follow the manufacturer’s instructions and consult a professional electrician if you are unsure about any part of the installation process.
In conclusion, a Lutron dimmer switch can enhance the lighting in your home and create a more comfortable and inviting atmosphere. By following the wiring diagram provided by Lutron, you can easily install the dimmer switch yourself and enjoy the benefits of adjustable lighting. Remember to always prioritize safety when working with electricity and consult a professional if needed.