When it comes to wiring a 4 wire alternator, it’s important to follow the correct diagram to ensure proper functionality. The alternator plays a crucial role in charging the battery and powering the electrical components of a vehicle. By understanding the wiring diagram, you can easily connect the alternator to the battery and other necessary components.
Whether you’re replacing an old alternator or installing a new one, having a clear wiring diagram can make the process much easier. With the right instructions, you can quickly and efficiently wire the alternator to ensure optimal performance.
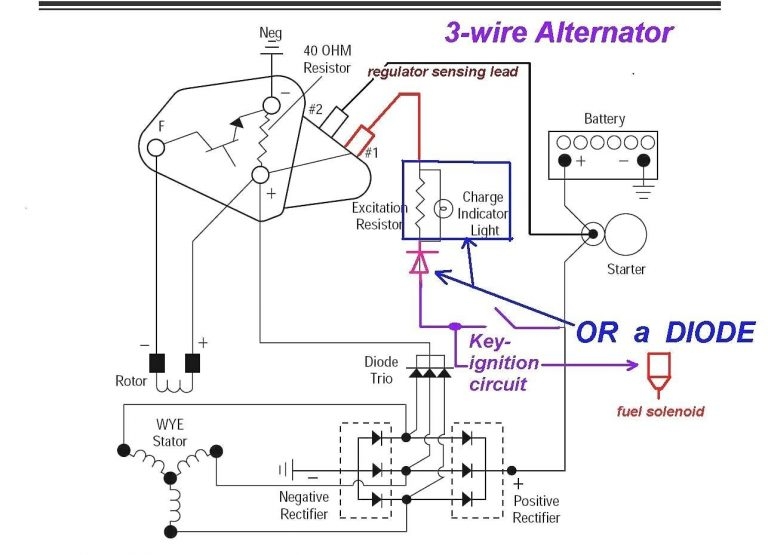
 Three Wire Alternator Wiring Diagram (www.tankbig.com)
One common 4 wire alternator wiring diagram includes connections for the battery, ignition switch, voltage regulator, and alternator. The battery connection ensures that the alternator can charge the battery, while the ignition switch connection allows the alternator to turn on and off with the vehicle.
The voltage regulator is responsible for regulating the output of the alternator to prevent overcharging the battery. By following the wiring diagram, you can properly connect these components to ensure that the alternator functions correctly.
Overall, understanding the 4 wire alternator wiring diagram is essential for proper installation and functionality. By following the correct connections for the battery, ignition switch, voltage regulator, and alternator, you can ensure that your vehicle’s electrical system operates smoothly and efficiently.
In conclusion, the 4 wire alternator wiring diagram is a crucial component of installing or replacing an alternator in a vehicle. By following the correct connections and understanding the diagram, you can ensure that the alternator charges the battery and powers the electrical components effectively. Proper installation is key to maintaining the functionality and longevity of the alternator.