When it comes to upgrading or replacing the alternator in your vehicle, understanding how to properly wire a 3 wire alternator is crucial. The 3 wire alternator is a popular choice for many vehicles due to its simplicity and reliability. By following a wiring diagram, you can easily install a 3 wire alternator in your vehicle and ensure it functions correctly.
Before diving into the wiring process, it’s important to gather all the necessary tools and materials. You will need a wiring diagram specific to your vehicle, a multimeter to test the connections, wire cutters/strippers, and electrical tape. Additionally, make sure to disconnect the battery before starting any wiring work to prevent any accidents.
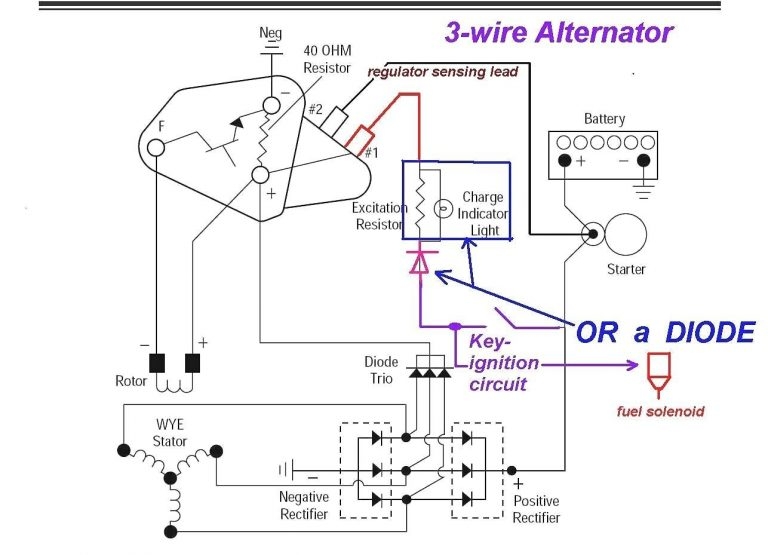
 Bosch 3 Wire Alternator Wiring Diagram (axiom-northwest.com)
One of the key features of a 3 wire alternator is that it requires a voltage sensing wire, a field wire, and a ground wire. The voltage sensing wire is connected to the battery to monitor the voltage level, while the field wire is responsible for regulating the alternator output. The ground wire completes the circuit and ensures proper functioning of the alternator.
Start by locating the terminals on the alternator and identifying which wire corresponds to each terminal. Refer to the wiring diagram to connect the voltage sensing wire to the battery, the field wire to the alternator terminal, and the ground wire to a suitable grounding point on the vehicle chassis. Once all the connections are made, use the multimeter to test the continuity and voltage output of the alternator.
After ensuring that all connections are secure and the wiring is correct, you can re-connect the battery and start the vehicle to verify that the 3 wire alternator is functioning properly. Keep an eye on the voltage gauge to ensure that the alternator is charging the battery at the correct level. If everything is working as it should, you have successfully wired a 3 wire alternator in your vehicle.
In conclusion, understanding the wiring diagram for a 3 wire alternator is essential for a successful installation. By following the correct wiring process and ensuring all connections are secure, you can upgrade or replace the alternator in your vehicle with confidence. Proper wiring of the alternator will ensure reliable performance and charging of the battery, keeping your vehicle running smoothly.